Tuya Smart
Table of Contents
Prerequisites
- Your devices need first to be added in the Tuya Smart or Smart Life app.
- You will also need to create an account in the Tuya IoT Platform. This is a separate account from the one you made for the app. You cannot log in with your app’s credentials.
Create a Project
- Log in to the Tuya IoT Platform
- In the left navigation bar, click
Cloud>Development. - On the page that appears, click
Create Cloud Project. - In the
Create Cloud Projectdialog box, configureProject Name,Description,Industry, adnData Center. For theDevelopmentMethod field, selectSmart Homefrom the dropdown list. For theData Centerfield, select the zone your are located in. Refer to country/data center mapping list here
- Click
Createto continue with the project configuration. - In Configuration Wizard, make sure you add
Device Status Notification API. The list of API should look like this: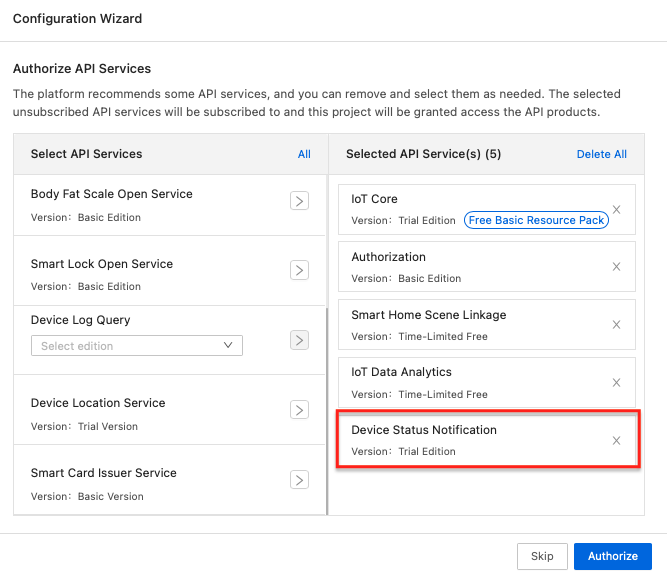
- Click
Authorize.
Link Devices by App Account
- Navigate to the
Devicestab. - Click
Link Tuya App Account>Add App Account.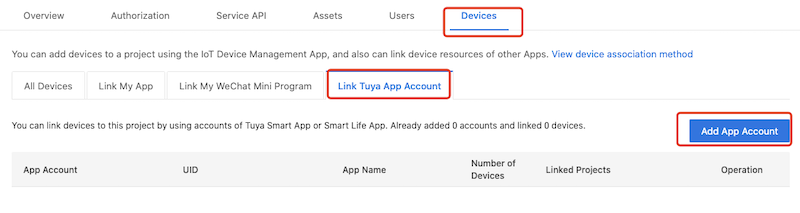
- Scan the QR code that appears using the
Tuya Smartapp orSmart Lifeapp.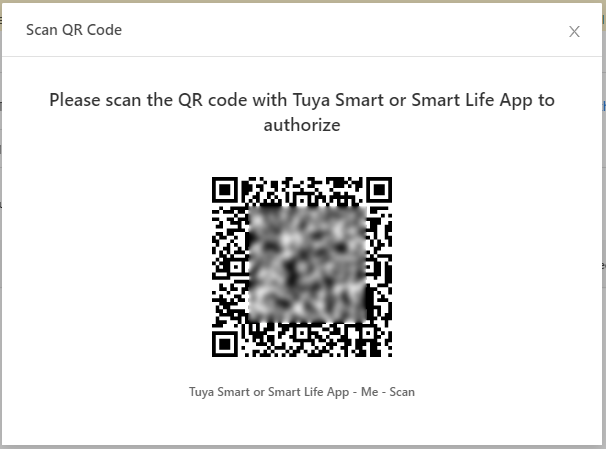
- Click
Confirmin the app. - To confirm that everything worked, navigate to the
All Devicestab. Here you should be able to find the devices from the app.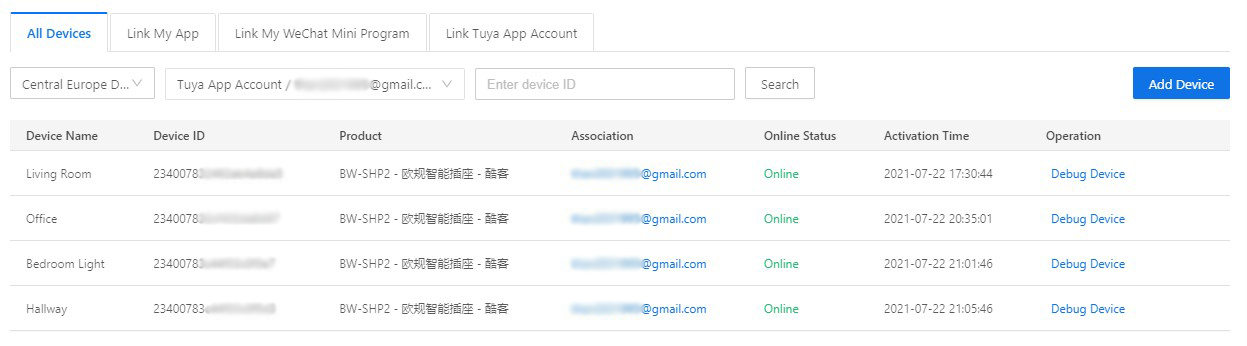
- If zero devices are imported, try changing the DataCenter and check the account used is the “Home Owner”. You can change DataCenter by clicking the Cloud icon on the left menu, then clicking the Edit link in the Operation column for your newly created project. You can change DataCenter in the popup window.
Get Authorization Key
Click the created project to enter the Project Overview page and get the Authorization Key. You will need these for setting up the integration. in the next step.

Local Network Fallback
The Tuya IoT Core trial expires roughly every six months, and while it is lapsed the cloud API rejects every call. To keep the extension usable, commands fall back to Tuya's local network protocol.
How it works:
- While the cloud is reachable, each device's local key and address are kept in the extension's cache along with the rest of its data.
- If a command fails because the subscription has expired, it is retried directly against the device on your network, and the toast says so.
- The device list itself falls back to the last cached copy.
Limitations, which are worth knowing before relying on it:
- It only works on the same local network as the devices. It does nothing remotely.
- Tuya devices accept a single local connection at a time, so it will not work while the Tuya Smart or Smart Life app is open on your phone.
- Sensors are not supported; they only report when their state changes.
- The local protocol addresses data points by number, and Tuya's cloud API does not publish that number. It is derived from Tuya's standard instruction set and then checked against the device's own schema. If they disagree, the command is refused rather than sent to the wrong data point.
- A device's local key changes if you remove and re-add it in the app. Open the extension once while the cloud works to refresh it.
- Discovering new devices always needs the cloud.
Shortcuts and Siri
The Control Device command takes arguments, so it can be opened as a deeplink from Apple Shortcuts, and through Shortcuts from Siri:
raycast://extensions/andresmorelos/tuya-smart/control-device?arguments={"query":"turn on kitchen lamp"}
Add an Open URLs action in Shortcuts with that URL, name the shortcut, and it becomes a Siri phrase. Percent encoding the argument JSON is more reliable in some Shortcuts versions, and both forms work.
The action can be written into the phrase or passed separately, whichever suits the shortcut:
?arguments={"query":"turn on kitchen lamp"}
?arguments={"query":"kitchen lamp","action":"on"}
?arguments={"query":"living room curtain","action":"open"}
queryis the device name, optionally with the action in front of or behind it. A name matches loosely, so "kitchen lamp" finds "Kitchen Lamp".actionaccepts on, off, stop and toggle, along with the words people actually say: open, close, enable, disable, start, shut, pause, flip.switchNamepicks a gang on a multi-switch device, by its name or its data point code.
A device name that could mean several devices is refused rather than guessed at, and the
HUD says which ones matched. The same goes for a multi-gang device with no switchName:
switching the wrong relay unattended is worse than doing nothing. Curtains need an
explicit action, since there is no sensible opposite of a curtain's current position.
Commands sent this way use the same cloud path as the rest of the extension, including the local network fallback described above.
Troubleshooting
If no devices show up
-
First, make sure the devices show up in Tuya’s cloud portal under the devices tab.
-
In the Tuya IoT configuration cloud portal, you must NOT link your non-developer account under the “Users” tab. Doing so will work, and you can even still add the devices under the devices tab, but the API will send 0 devices down to Home Assistant. You must only link the account under the Devices->“Link Tuya App Account”. If it shows up on the users tab, be sure to delete it.
-
Your region may not be correctly set.
-
Make sure your cloud plan does not need to be renewed (see error #28841002 on this page).
1004: sign invalid
Incorrect Access ID or Access Secret. Please refer to the Configuration part above.
1106: permission deny
-
IoT Core subscription expired: the trial has to be extended roughly every six months on the Tuya IoT Platform under
Cloud>Cloud Services>IoT Core>My Subscriptions. The extension reports this explicitly when it happens. -
App account not linked with cloud project: On the Tuya IoT Platform, you have linked devices by using Tuya Smart or Smart Life app in your cloud project. For more information, see Link devices by app account.
-
Incorrect username or password: Enter the correct account and password of the Tuya Smart or Smart Life app in the Account and Password fields (social login, which the Tuya Smart app allows, may not work, and thus should be avoided for use with the Home Assistant integration). Note that the app account depends on which app (Tuya Smart or Smart Life) you used to link devices on the Tuya IoT Platform.
-
Incorrect country. You must select the region of your account of the Tuya Smart app or Smart Life app.
1100: param is empty
Empty parameter of username or app. Please fill the parameters refer to the Configuration part above.
2406: skill id invalid
- Make sure you use the Tuya Smart or SmartLife app account to log in. Also, choose the right data center endpoint related to your country region. For more details, please check Country Regions and Data Center.
- Your cloud project on the Tuya IoT Development Platform should be created after May 25, 2021. Otherwise, you need to create a new project.
- This error can often be resolved by unlinking the app from the project (Devices tab > Link Tuya App Account > Unlink) and relinking it again.
28841105: No permissions. This project is not authorized to call this API
Some APIs are not authorized, please Subscribe then Authorize. The following APIs must be subscribed for this tutorial:
- Device Status Notification
- Authorization
- IoT Core
- Smart Home Scene Linkage
- IoT Data Analytics
28841002: No permissions. Your subscription to cloud development plan has expired
Your subscription to Tuya cloud development IoT Core Service resources has expired, please extend it in Cloud > Cloud Services > IoT Core > My Subscriptions tab > Subscribed Resources > IoT Core > Extend Trial Period.